O'Grady NP, Alexander M, Burns LA, et al; Healthcare Infection Control Practices Advisory Committee (HICPAC). Guidelines for the prevention of intravascular catheter-related infections. Clin Infect Dis. 2011 May;52(9):e162-93. doi: 10.1093/cid/cir257. Epub 2011 Apr 1. PMID: 21460264; PMCID: PMC3106269.
Peripheral venous catheter placement is the simplest method of obtaining vascular access for the administration of drugs or fluids. Drugs intended for IV administration usually should be appropriately diluted. Drugs can be administered IV as injection (bolus), intermittent infusion, or continuous IV infusion. Most parenteral nutrition formulas or other high-osmolarity substances (eg, concentrated KCl solution) as well as drugs that may cause vein damage should not be administered via peripheral veins. Large-bore peripheral venous catheters allow for a more rapid administration of fluids and blood products compared with standard central venous catheters. Peripheral catheters are characterized by lower flow resistance, as they are shorter than central catheters and have an equal or larger bore.
Potential ComplicationsTop
As in IV injections (see Intravenous Injections). Catheter-associated infections: see Intravascular Catheter-Related Infections.
Patient Preparation and Puncture SiteTop
As in IV injections.
EquipmentTop
As in IV injections, but a peripheral venous catheter is used instead of a needle. In adults the following catheter sizes are used: 22 gauge (blue, bore 0.8 mm), 20 gauge (pink, bore 1 mm), 18 gauge (green, bore 1.2 mm), 17 gauge (white, bore 1.4 mm), 16 gauge (grey, bore 1.7 mm), and 14 gauge (orange, bore 2 mm); 18-gauge and 20-gauge catheters are most frequently used. Larger catheters (14 or 16 gauge) allow for more rapid infusions. For intermittent infusions use an infusion kit containing infusion tubing fitted with a clamp and a sharp-tipped reservoir used to pierce the bottle/container with the infusion fluid or drug solution. Use a 3-way stopcock and drop counter when necessary. For continuous infusions use an infusion pump, infusion tubing, appropriate syringe (50, 20, or 10 mL; some infusion pumps accept only certain types of syringes), and 3-way stopcock.
ProcedureTop
1. Close the curtains to ensure privacy for the patient. Explain the planned procedure to the patient and confirm consent.
2. Select a suitable peripheral vein. The most commonly used veins are in the upper limbs: antecubital veins, forearm veins, and the dorsal venous network on the back of the hand. If locating a vein is difficult, ultrasonography can be used to identify a suitable peripheral vein. Using a linear probe on the shallowest depth setting, scan for small compressible vessels, ideally <1.5 cm from the skin surface. If the vein is not visible to the naked eye, you may need to cannulate the vein under direct guidance (step 6, below).
3. Wrap a tourniquet (usually on the upper arm) to fill the peripheral veins. Visualizing and puncturing a vein can be facilitated by warming the limb and massaging (tapping) the planned injection site. Alternatively ask the patient to open and close their fist several times.
4. Clean and disinfect your hands and wear disposable gloves.
5. Clean and disinfect the puncture site using a gauze swab soaked with a disinfectant solution or with prepackaged sterile swabs. Spray the skin with a disinfectant solution from a distance of 20 to 30 cm and wait for ~1 to 1.5 minutes (unless the patient’s condition requires immediate venous access).
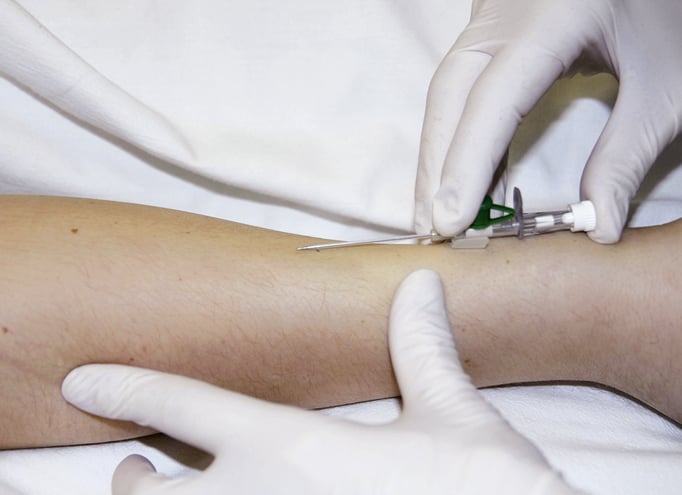
6. Spread the skin taut below the planned injection site using a thumb or fingers of one hand. Insert the catheter with a needle into the skin at a ~30-degree angle (Figure 21.19-2). If you are cannulating the vein under ultrasound guidance, cover the ultrasound machine with a clear waterproof dressing (eg, Tegaderm). Center the probe over the target vessel (check both long-axis and short-axis views to obtain a clear sense of the vessel location and course). Follow the needle tip until the catheter has entered the vessel.
7. When blood appears in the needle hub, hold the needle still with one hand and advance the catheter into the vessel with the other hand. Then withdraw the needle and release the tourniquet. If the needle was introduced very slowly, blood may appear in the needle hub while the tip of the catheter (shorter than the needle) is still located outside the vessel. Advance the needle with the catheter by a further ~1 mm before immobilizing the needle and attempting to advance the catheter over the needle into the vessel lumen.
8. Confirm patency of the catheter by aspirating blood and injecting a small volume of 0.9% saline.
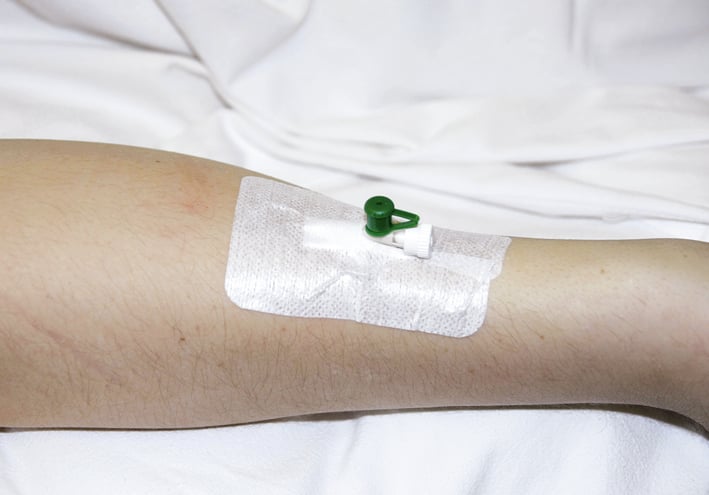
9. Attach the catheter to the skin using tape or a special dressing (Figure 21.19-3).
10. Document date and time of catheter placement in appropriate medical records (or on the dressing).
11. Drug administration:
1) Injection: Maintaining sterile conditions, draw the drug into the syringe, dilute (if appropriate), and inject via the catheter (this is usually done slowly). Occasionally drugs can be injected using a plain injection needle (using the same technique as in blood sample collection with a plain needle and syringe; inject the drug after aspirating blood into the syringe). If only a portion of the drug dose in the syringe has been administered and you presume that the remaining drug may need to be administered later, protect the syringe by placing a sterile needle covered with a needle cap and label the syringe (name of the drug, dose in mg/mL); check how long the diluted drug can be stored and in what storage conditions.
2) Intermittent infusion: Maintaining sterile conditions, dilute the drug in an infusion fluid (note the name and dose of the diluted drug on the container/bottle), prime the infusion set (infusion tubing with a reservoir) with the solution to expel any air, and fill the reservoir to half of its volume. Connect the tubing to the catheter (usually using a 3-way stopcock previously primed with an infusion fluid) and set the required infusion rate using the pump, valve, or drop counter.
3) Continuous infusion: Make sure that the syringe can be used with your infusion pump. Select an appropriate type of syringe from the menu (if applicable to the pump model). Maintaining sterile conditions, prepare drug solution in the syringe. Prime the infusion tubing using the prepared solution to expel any air, connect tubing to the catheter (this is usually done with a 3-way stopcock), label the syringe, and carefully mount it in the infusion pump (drug name and total dose or strength in mg/mL must remain visible at all times). Then set the infusion rate and start the infusion (health care institutions should provide tables for calculating desired doses of the most commonly used drugs for infusion rates in mL/h [or minutes]; alternatively you may program a modern infusion pump by inputting drug name, total dose, solution volume [or drug concentration], and the patient’s body mass, and set the infusion rate expressed, eg, as microg/min/kg).
12. After every drug administration flush the catheter with 0.9% saline. Do not reuse Luer lock plugs. Replace the dressing if soaked. In patients with features of local inflammation, pain, or fever, remove the catheter immediately. Treatment of superficial thrombophlebitis: see Superficial Thrombophlebitis.
13. After removing the catheter, disinfect the venipuncture site and apply compression. Cover the site with a small adhesive dressing to stop bleeding.
FiguresTop

Figure 21.19-2. Peripheral venous catheterization.

Figure 21.19-3. Protecting the catheter with a dressing.